Getting Started
Introduction
A small introduction to Indian logistics services..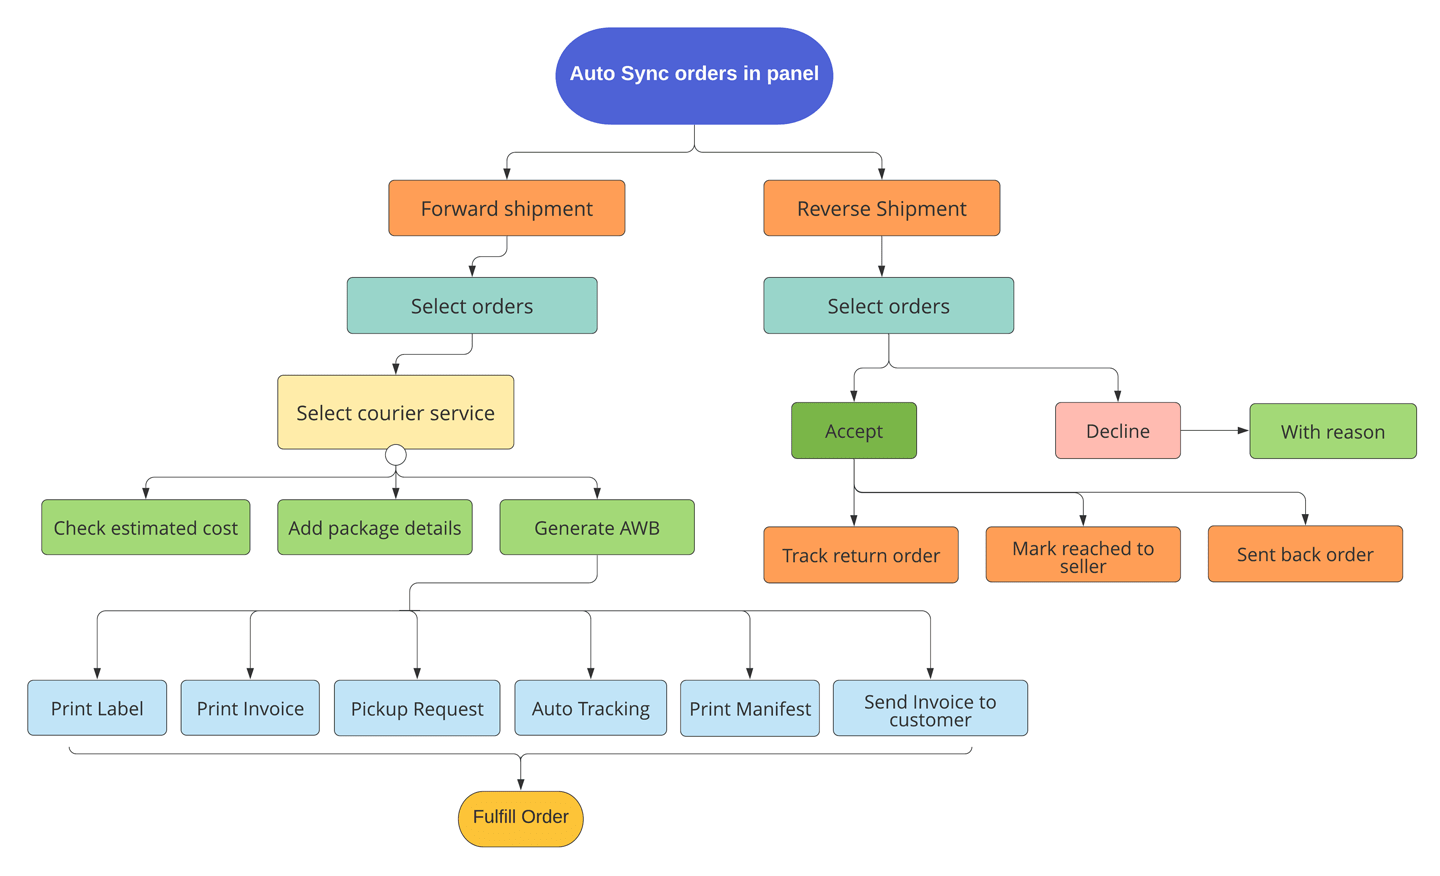
Why this app?
Orders
- Order division by current order status like Ready to ship, Shipped and Fulfilled.
Bulk Shipment
- Select bunch of orders and process in few clicks to generate AWB numbers
Label and Invoices
- Print labels and invoices in bulk with various types of template design.
Manifest
- Customized manifest print option with export functionality.
Tracking
- Track current status of courier in one click.
Estimated Cost
- Check order wise estimated cost before ship the orders.
Notification
- Make your customers updated with each step of order by sending email notifications.
Return Request
- Fully customize return request page setup.
- Return, Replace and refund options for return orders.
Sent Back
- Sent back replaced orders to your customer and mark it.
Reports and Analytics
- Orders and revenue analytics dashboards.
Installing Indian Logistics Services
Set up Indian Logistics Services on your Shopify Store in 3 steps.-
Step 1 : Here you go to the "Indian Logistics Services". Go to app
-
Step 2 : Click on "Add App".

-
Step 3 : Complete installation by clicking "Install App".
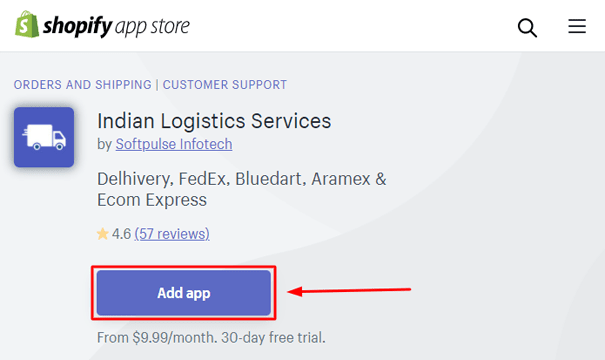
Once the app is installed successfully, then it will be ready to use. You will have all the app's features and functionalities in app admin.
Plan choose
You can choose plan as per your store size, no need to pay extra!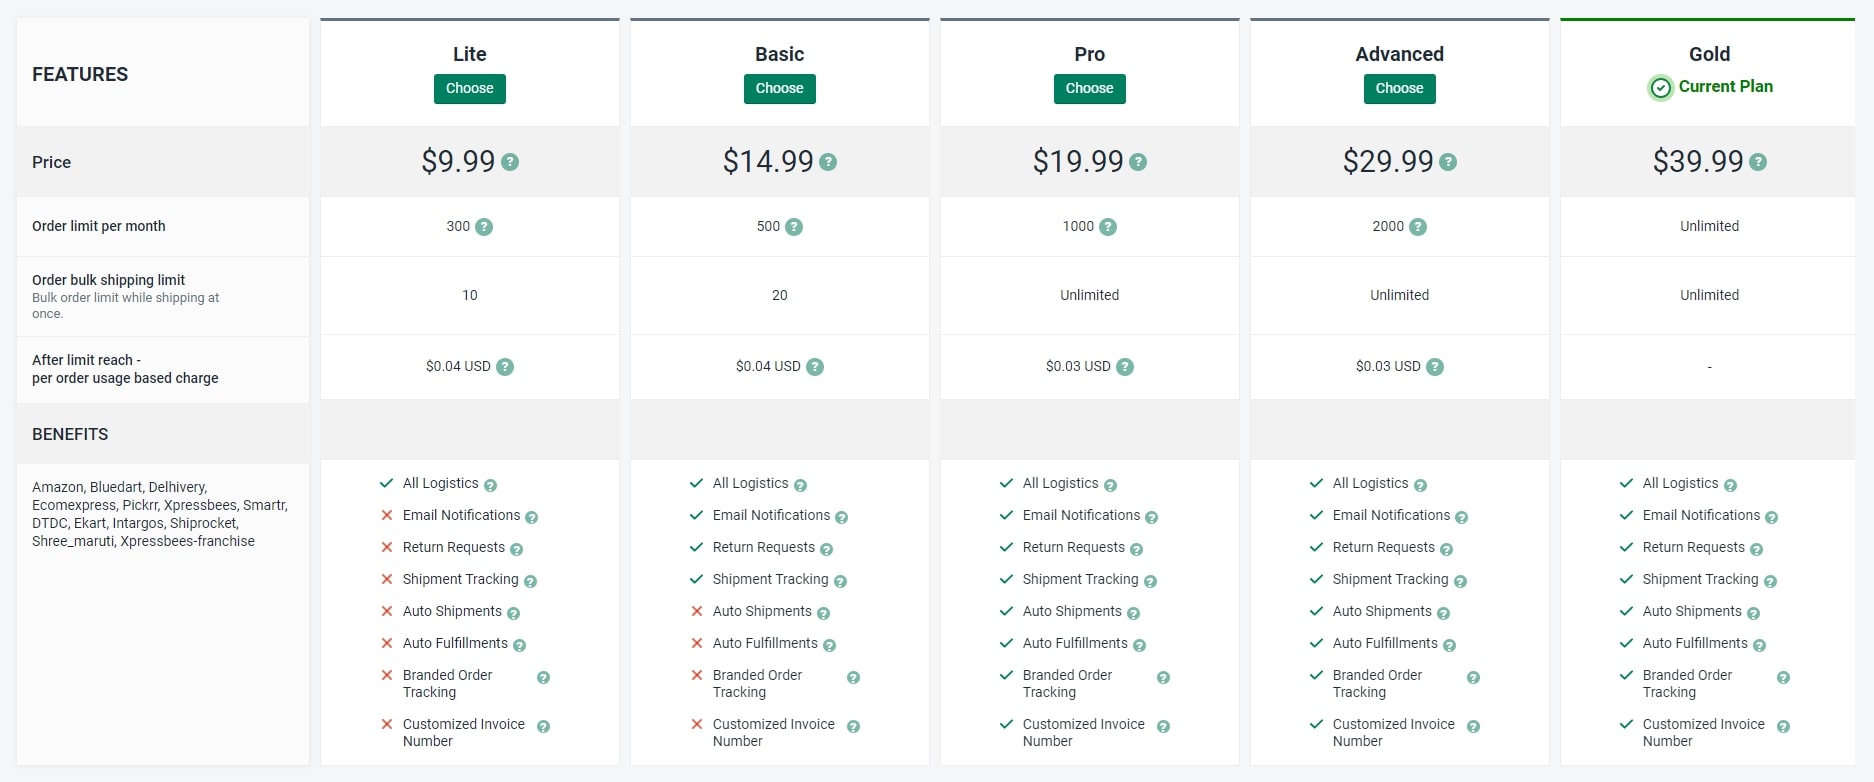
Features
Overview of the different features available on the appBulk Shipments
Label and Invoices
Tracking and Cost
Bulk Fulfillment
Return Management
Reporting & Analytics
Plan wise features
Choose your plan based on given required features.
- Email Notifications : Send emails to your customers for order shipments, delay shipments, revers orders accept, decline etc events.
- Return Request : You can set return orders setup for your customers at front side of your store, when customer can send the request for return the order with reason and other required details and you will get notification and return order list in admin panel for further process.
- Shipment Tracking : Orders live tracking after orders shipment with RTO status.
- Auto Shipments : Ship multiple orders in single click and full process will be done in background, you will receive the email notification for successfully generated AWB numbers.
- Auto Fulfillments : Auto fulfill orders once AWB number get generated or order deliverd to your customers (based on settings).
Services
Introduction
Delhivery's aim is to build the operating system for e-commerce in India. We provide parcel transportation, warehousing, freight, reverse logistics, cross-border and technology services to over 10000 customers including all of India's largest e-commerce companies and leading enterprises.
Delhivery is driven by a mission to shrink time and distance, making the world a smaller place for our customers and over a billion consumers they serve.
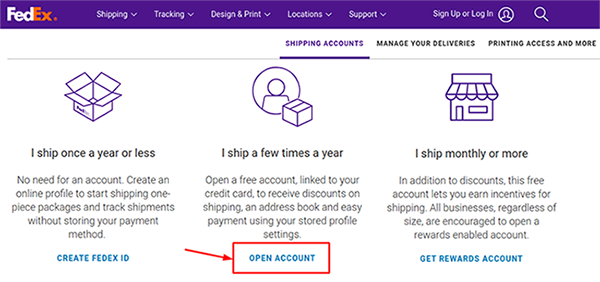
How to setup delhivery logistic?
- Goto Delhivery website https://track.delhivery.com/
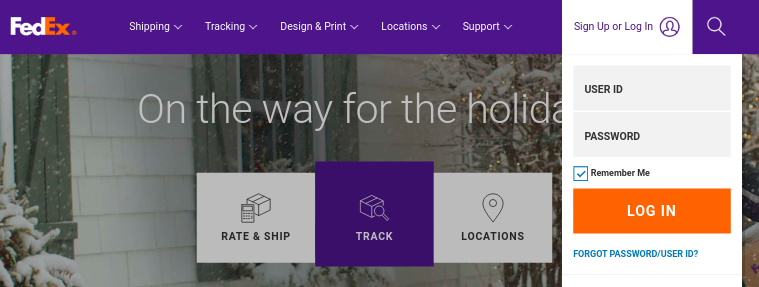
- Put your Delhivery username and Password.
- After successful login,on top right click on api key link to get token.
Follow steps for setting up a delivery account in the logistics app admin.
-
Step 1 : Go to app -> Settings.
-
Step 2 : Edit Delhivery API Key and and Client Name (Account name for your referance)
-
Step 3 : Click on the Save button.
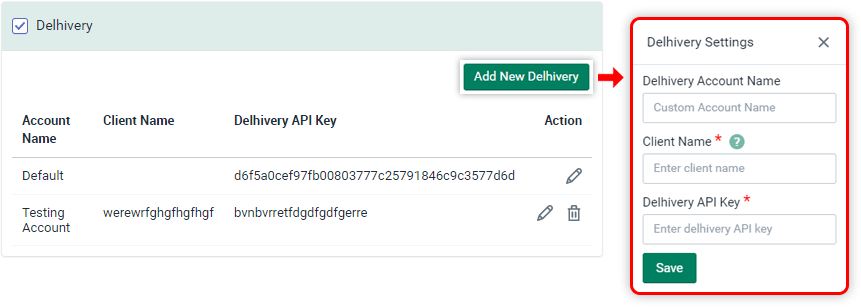
The red star (*) fields are required. This information will be provided by delivery services.
Same way you can add multiple Delhivery accounts details or multiple warehouse details with common API key.
Introduction
FedEx Services provides sales, marketing, information technology, communications, customer service, technical support, billing and collection services, and certain back-office functions that support our transportation segments.
FedEx Logistics provides a full suite of supply chain solutions, specialty transportation, cross border e-commerce technology services, customs brokerage, and trade management tools and data.
How to setup FedEx logistic?
Follow the steps below to get your FedEx Production Credentials.
-
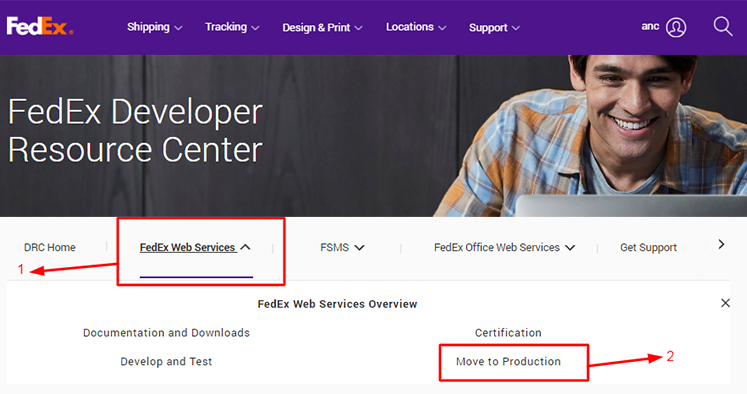
Step 1 : Goto Fedex website .


-
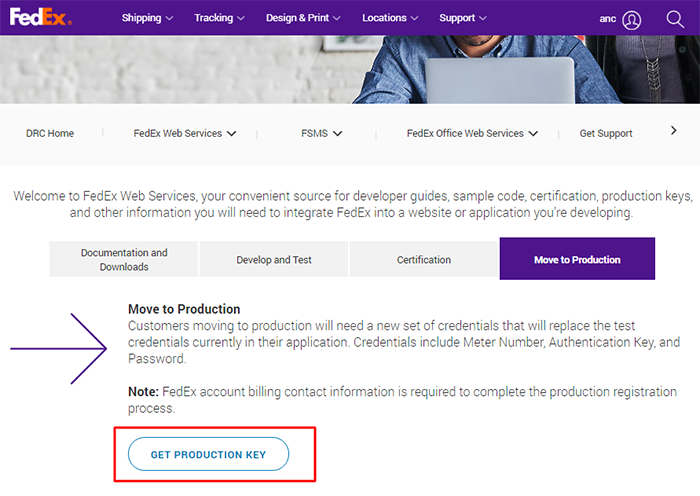
Step 2 : Click on FedEx Web Services section and Move to Production.

-
Step 3 : Click on the Get Production Key button.

-
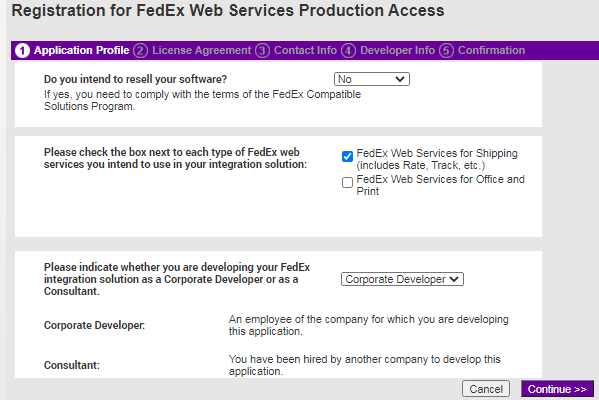
Step 4 : You will get the Registration for the FedEx Web Services Production Access page.

-
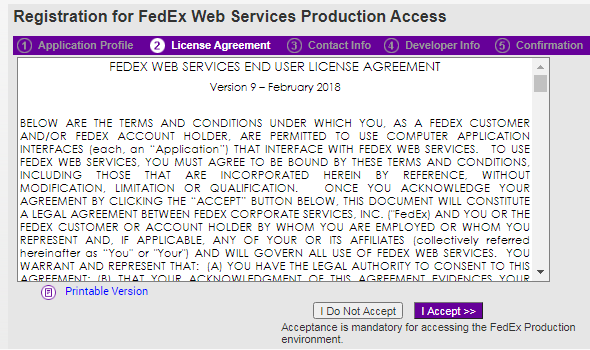
Step 5 : Click on Continue, you will be redirected to License Agreement. Accept the license agreement to proceed.

-
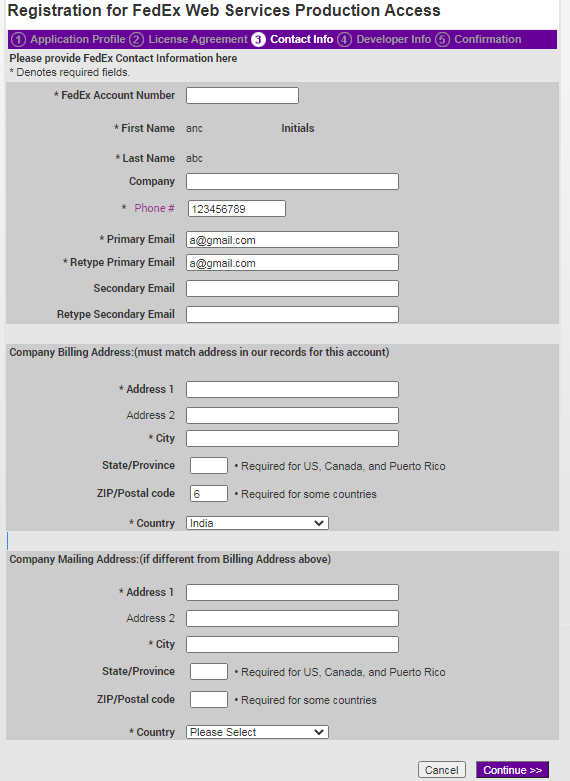
Step 6 : Fill out the Registration for FedEx Web Services Production Access form.

-
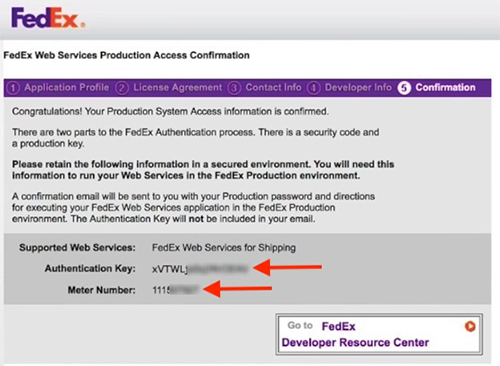
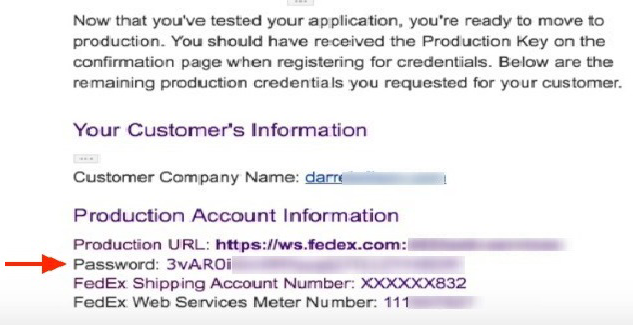
Step 7 : Click on Get Your Key. You will get the following details on your screen.
- FedEx Production Account Number (Available Under Account Management section)
- FedEx Production Meter Number
- FedEx Production Web Service Key.


-
Step 8 : The Web Service Password will also be sent to you via email.


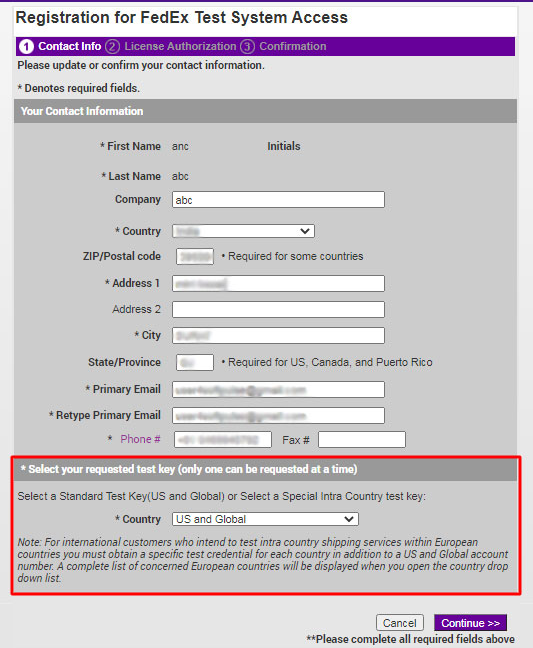
Steps to get a test API key.
-
Step 1 : Login into the FedEx account.
-
Step 2 : Go to FedEx Web Services Page.
-
Step 3 : Click on Get Your Test Key.
-
Step 4 : Complete the form and make sure you are a global and U.S. Choose, then accept the agreement to continue.

-
Step 5 : You should receive an email with the title.


Follow steps for setting up a fedex account in the logistics app admin.
-
Step 1 : Go to app -> Settings.
-
Step 2 : Select FedEx checkbox.
-
Step 3 : Upload a new spreadsheet to verify COD serviceability in the FedEx Postal Code Capacity document and save it.
-
Step 4 : Then click on edit button.
-
Step 5 : Add FedEx account name, API key, password, Account number, Meter number detailed setup in Fedex form.
-
Step 6 : Click on the save button.
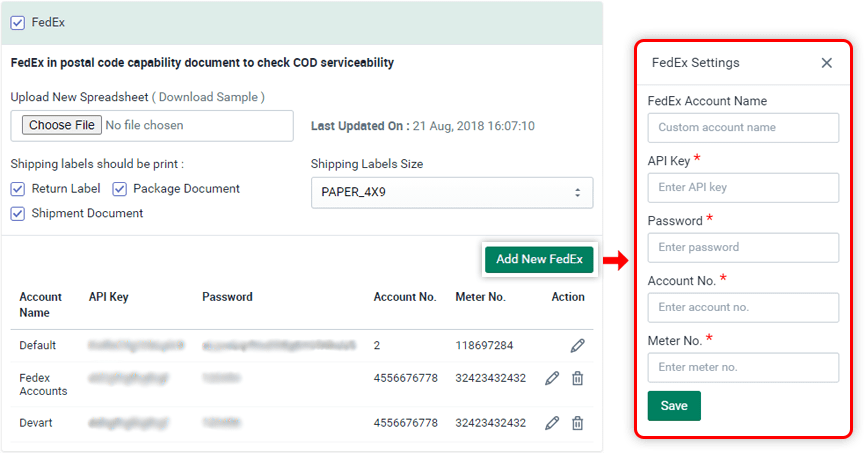
The red star (*) fields are required. This information is provided by FedEx services.
Same way you can add multiple fedex account details.
Introduction
Blue Dart Express Limited is an Indian logistics company providing courier delivery services.
As part of the DPDHL Group’s (DHL Express, DHL Global Forwarding & DHL Supply Chain) Post - E-commerce - Parcel (PeP) division, Blue Dart accesses the largest and most comprehensive express and logistics network worldwide, covering over 220 countries and territories and offers an entire spectrum of distribution services including air express, freight forwarding, supply chain solutions and customs clearance.
How to setup Blue Dart logistic?
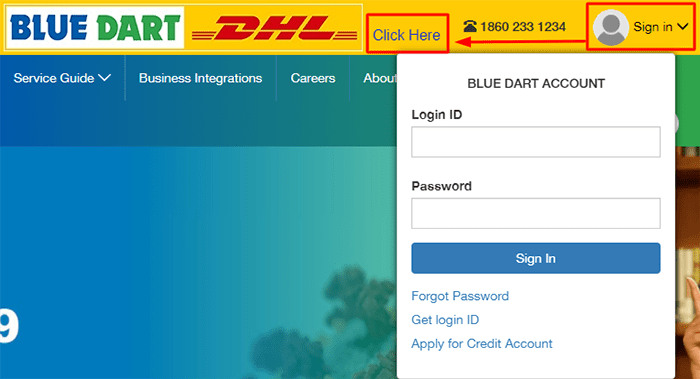
Register / Login in a bluedart account.
Get account integration information from blue dart services.
Follow steps for setting up a Blue Dart account in the logistics app admin.
| Sl.no | Please share following inputs | Remarks |
|---|---|---|
| 1 | Expected no. of shipments per month, possibly next six month projection.(If any)? | |
| 2 | Average Value of Product /Shipment? | |
| 3 | Average Weight per piece or shipment? | |
| 4 | Preferred Locations? | |
| 5 | Ratio of COD & Prepaid orders? | |
| 6 | What are the Contents or Product Categories? | |
| 7 | Single Point Pickup or Multiple P/up? | |
| 8 | Expected date of launch of website or if website already launch. Please tell us the website address? | |
| 9 | In case of high value shipments the availablity of paperwork for regulatory clearances? | |
| 10 | Place of Pickup - (provide complete facility address with Pincode/Phone number)? | |
| 11 | Customer Email IDs. | |
| 12 | Customer actual city/state with Pincdoe for meeting with Blue Dart? |
Fill and send the details to madanL@bluedart.com
Follow steps for setting up a bluedart account in the logistics app admin.
-
Step 1 : Go to app -> Settings.
-
Step 2 : Select Blue Dart checkbox.
-
Step 3 : Then click on edit button and add the details.
-
Step 3 : Add account name, License key, Login ID, Customer code, Customer pincode, Origin area in blue dart settings form.
-
Step 4 : Click on the save button.
- SPN is not required field, you can leave it blank if you don't have SPN value.
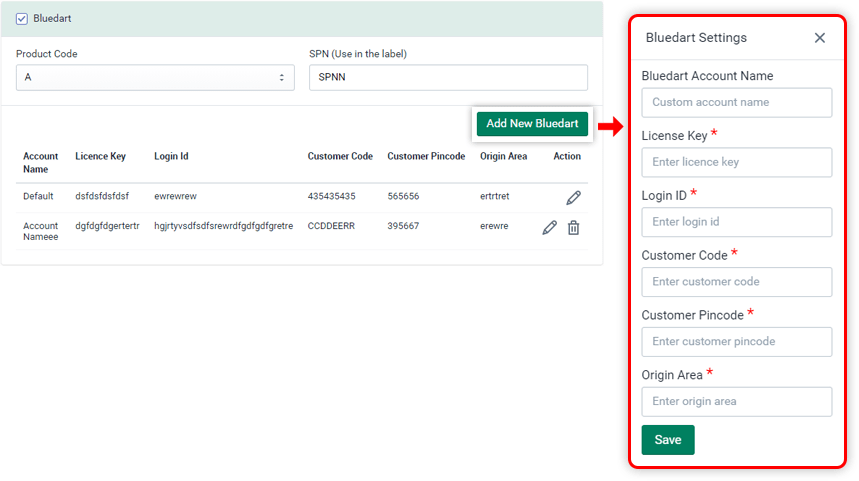
The red star (*) fields from the Bluedart Settings form are required. This information is provided by Blue Dart services.
Introduction
Ecom Express Private Limited is a leading end-to-end logistics solutions provider with a focus on speed, safe and reliable nation-wide express delivery services to the e-commerce industry.
Ecom Express provides the safest, most reliable pick-up and delivery of products (ordered online) from warehouses / sellers to end-consumers using automated information systems for end-to-end order tracking.
Follow steps for setting up an Ecom Express account in the logistics app admin.
-
Step 1 : Go to app -> Settings, set test mode off.

-
Step 2 : Select Ecom Express checkbox.
-
Step 3 : Then click on Edit button.
-
Step 3 : Add account name, username and password in Ecom Express settings form.
-
Step 4 : Click on the save button.
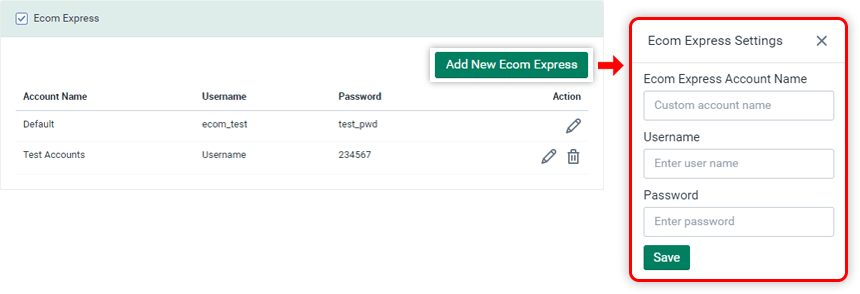
The red star (*) fields are required. This information is provided by Ecom Express services.
Introduction
Pickrr helps businesses scale rapidly by streamlining shipping and order fulfillment. Pickrr help you manage your deliveries across multiple carriers on a single dashboard to make your shipping experience affordable and hassle-free.
Pickrr’s leading and specialized shipping partners ensure a safe and fast order delivery across varying volumes, type or size
How to setup Pikrr logistic?
-
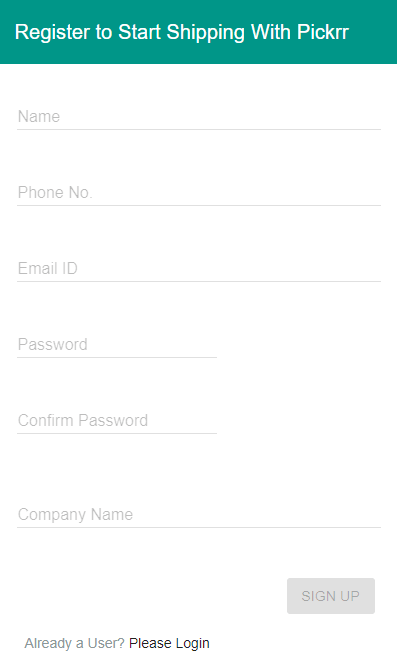
Step 1 : Register / Login in a pickrr account.
-
Step 2 : Get account integration information from pickrr services.
Follow steps for setting up a Pickrr account in the logistics app admin.
-
Step 1 : Go to app -> Settings.
-
Step 2 : Select Pickrr checkbox.
-
Step 3 : Click on edit button.
-
Step 3 : Add Pickrr account name and Auth token detailed setup in Pickrr form.
-
Step 4 : Click on the save button.
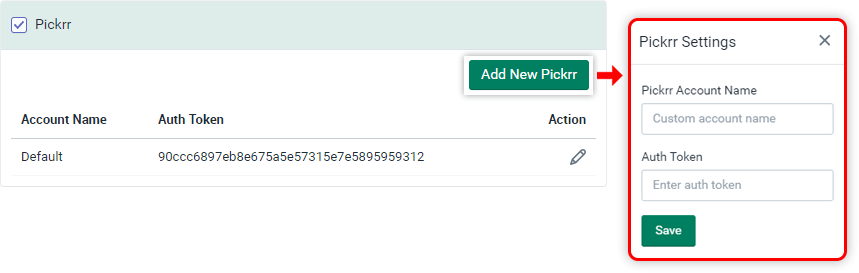
The red star (*) fields are required. This information is provided by Pickrr services.
Introduction
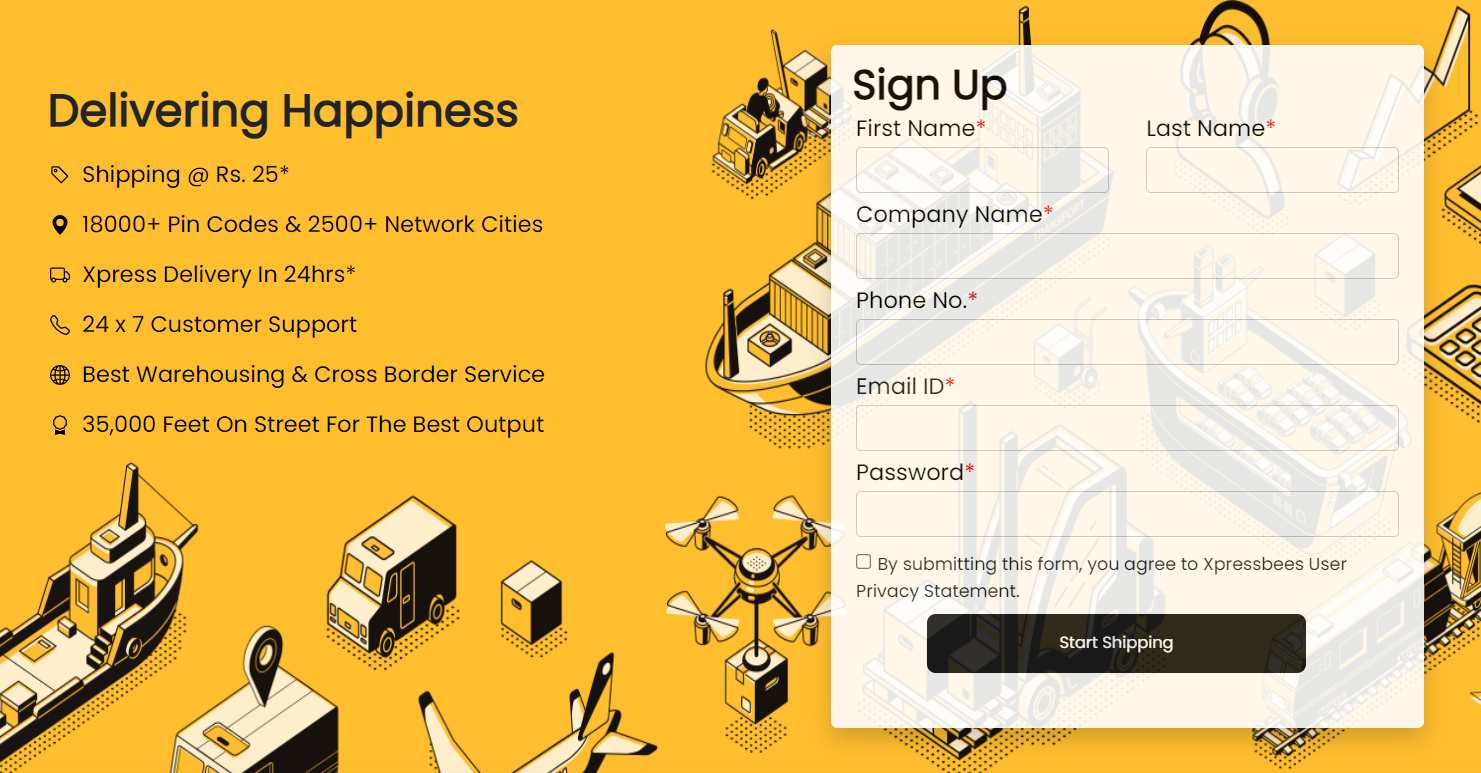
Xpressbees is fastest growing express logistics service provider in India catering to end-to-end supply chain solutions.
Xpressbees penchant for truly bending backwards to meet tough goals and years of industry expertise which, when put together, result in processes that are fool-proof and systems that are intuitive & cutting-edge.
How to setup Xpressbees logistic?
-
Step 1 : Register / Login in a Xpressbees account.
-
Step 2 : Send mail to technical support on techsupport.clients@xpressbees.com for API details.
Or You can contact with Ashutosh Thatte (AGM Sales) - 9871226722 . He will give you proper guideline.
Follow steps for setting up a Xpressbees account in the logistics app admin.
-
Step 1 : Go to app -> Settings.
-
Step 2 : Select Xpressbees checkbox.
-
Step 3 : Click on edit button.
-
Step 3 : Add Xpressbees account name, username, password and secret key.
-
Step 4 : Click on the save button.
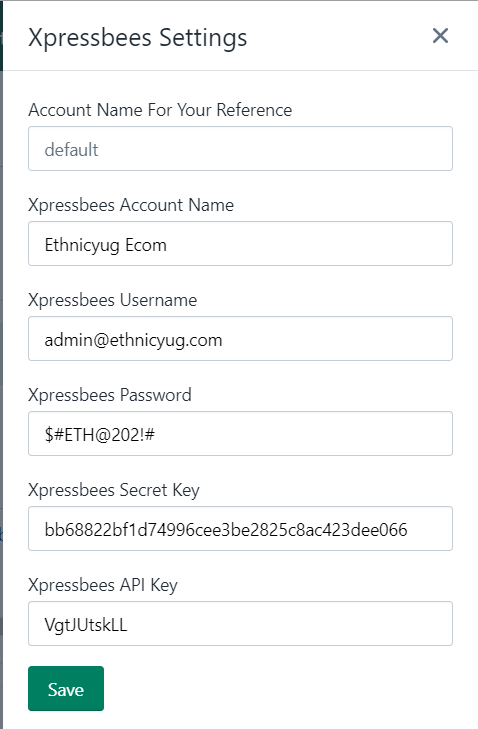
The red star (*) fields are required. This information is provided by Xpressbees services.
Introduction
Aramex was known as ‘Arab American Express’.
Aramex offers a wide range of innovative transportation and logistics technologies to support your business needs. From warehousing to facility management and value-added services,we can help make your business more efficient and increase customer satisfaction. Our services can be easily applied to a variety of business models across varying industries.
Follow steps for setting up an Aramex account in the logistics app admin.
-
Step 1 : Go to app -> Settings, set test mode off.
-
Step 2 : Select Aramex checkbox.
-
Step 3 : Click on edit button.
-
Step 3 : Add Aramex account name, Account country code, Account entity, Account no., Account pin, Username, Password detailed setup in Aramex form.
-
Step 4 : Click on the save button.
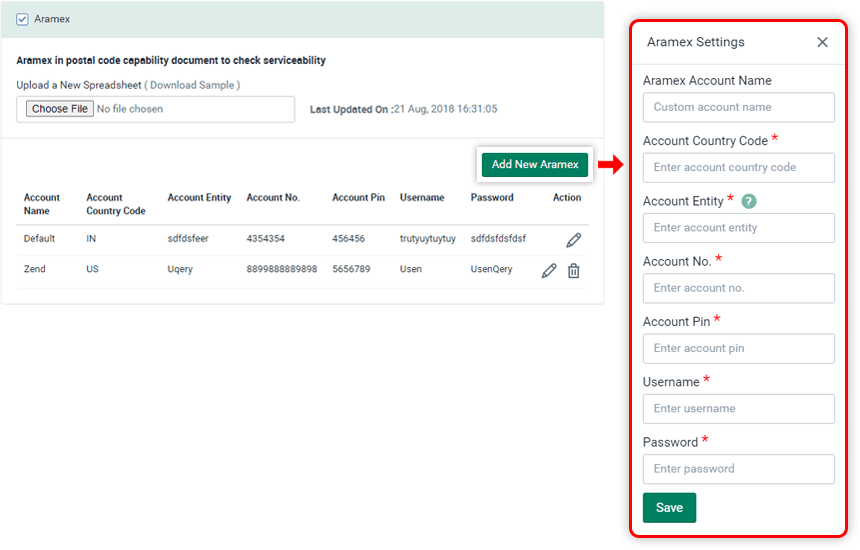
The red star (*) fields are required. This information is provided by Aramex services.
Introduction
To use ekart integration please create an account in ekart logistics.
After an creating account we need below details from your end.
- Ekart Token
- Merchant Token
- Location Code
To create an account with ekart you can contact to vandana.sharmams@flipkart.com sales person with your firm details.
Introduction
To use DTDC integration please create an account in DTDC logistics.
After creating an account we need below details from your end.
- API Key
- Customer ID
- Tracking Token
- Commodity Name
- Service Type
To create an account with DTDC you can contact to vignesh.b@dtdc.com sales person with your firm details or register here.
Introduction
To use Smartr integration please create an account in Smartr logistics.
After creating an account we need below details from your end.
- Client ID
- Client Key
- App ID
- Device ID
- Login Name
- Agent Code
- Shopper Account Code
To create an account with DTDC you can contact to ankurs@smartr.in sales person with your firm details or register here.
Settings
General Settings
General settings for your store which is required for shipments API.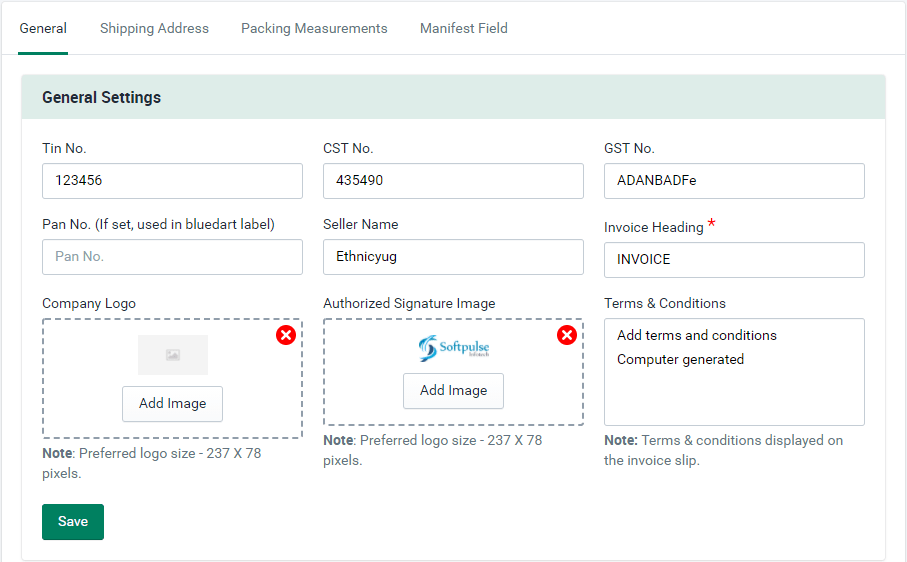
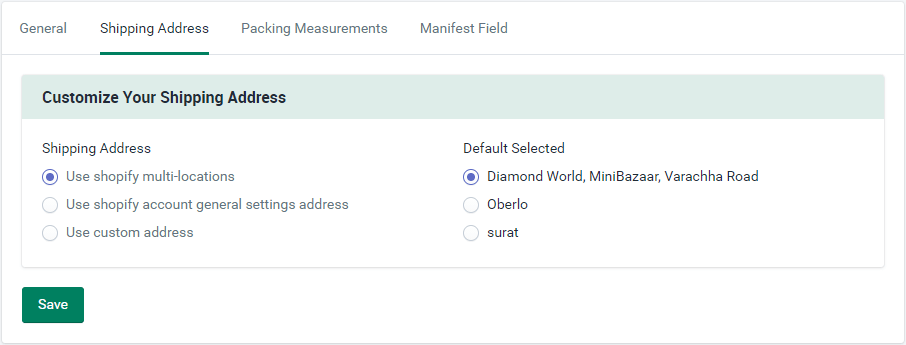
Shipping address
Set the shipping address.There are multiple option to set the shipping address like :
-
Shopify multiple location which will fetched from your store locations in admin.
-
Shopify general setting address means your main store address.
-
Customer address if you want to add any other address for shipments.
Packing measurements
You can set default packing measurements for shipping. you can modify it while shipment.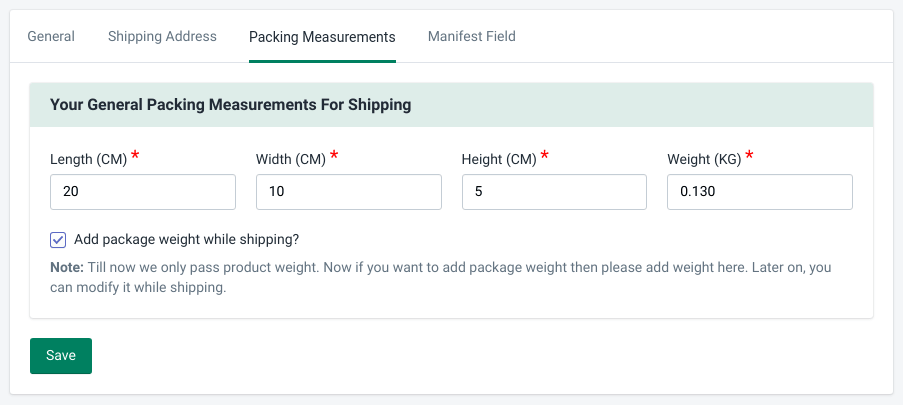
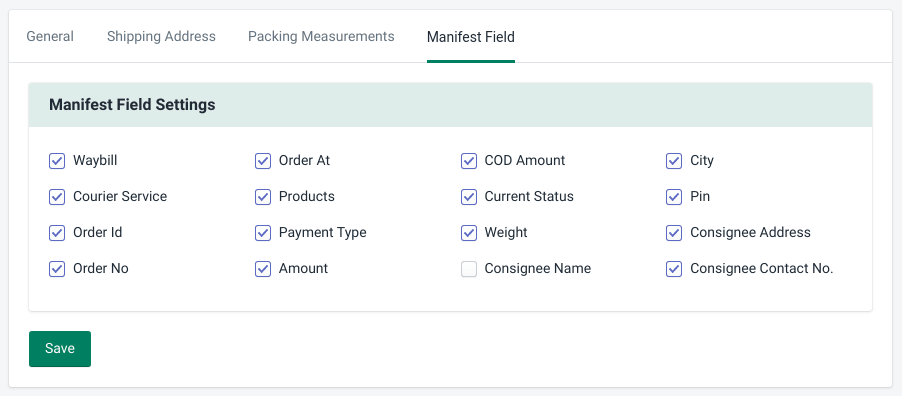
Manifest field
Set general Manifest field.Select Any manifest in logistics or Logistics manifest is the document that shows the items which have shipped from the supplier office to its final customer.
Whether there is one the transport companies or group of transport company, single logistics manifest document has been prepared which shows only detail of order id,Order no,products etc.
It is not a legal document but it is used for record purposes for both seller, transport and eCommerce website hub.
Logistics manifest is only the detail of items which has been transported for sending to the final customer
Return Requests
Setup Return Requests
Steps for return requests setup.Your store front setup for customers to send return request.
- Set navigation or link for customers. <a href="/apps/return-request" > Return Request </a>
-
You can also set it as a navigation menu.

Settings Return Requests
Set settings Return Requests.Return settings
Set return accept days after fulfillment and reasons for return which customers can select while requesting a return. Return order settings will be configured from the settings tab.
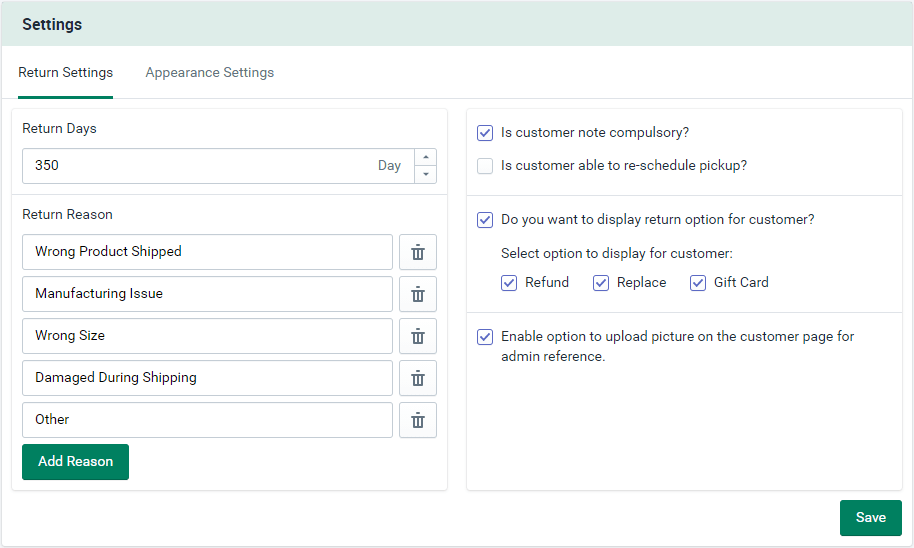
Appearance settings
Set font color and size, page heading, order table settings for return request on the front side page.
Admin side

|
Front side

|
Return Requests Action
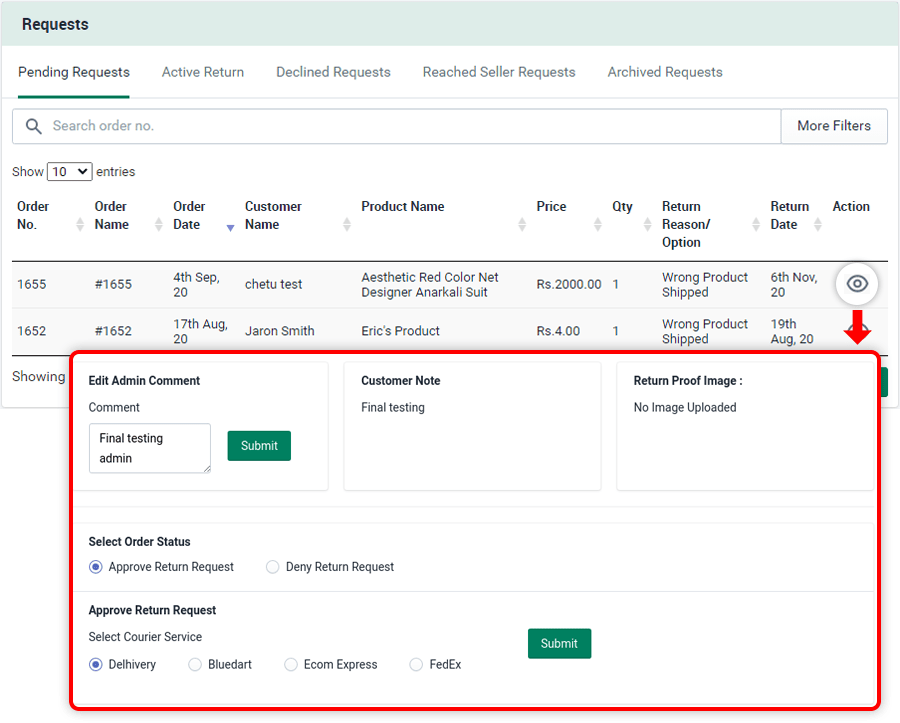
Return Requests records as per actions tacken.Pending request
There is a two option avaialble for pending return request :
-
Approve : Click on action button, it will give you the option to choose logistics as per your chosen plan, Select courier service and submit.

-
Deny : Click on action button select deny option and add Deny request reason and submit.

After approve the request it'll move to the active tab.
Active return
After approve the request there is multiple action given on active tab :
Get the tracking URL, re-schedule order, reached the seller and sent back the order and edit customer note.
-
Order tracking on click tracking number.
- Mark reached to seller order.
- Re-Schedule return shipment in case of failure.
- Mark Sent back items.
- Add any note if required
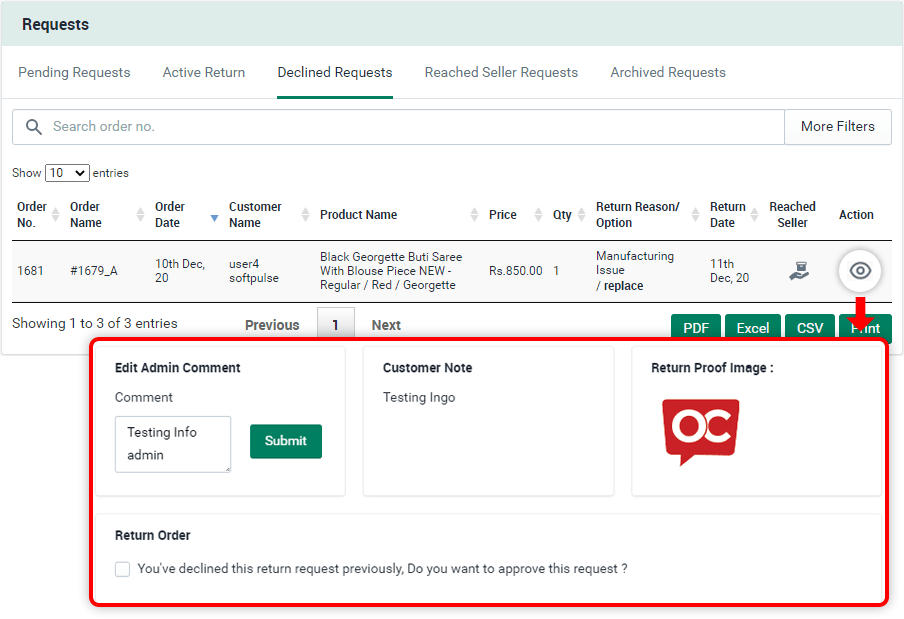
Declined return request
Get the declined order list here. You can move order details to reach the seller and send it back. Also edit customer notes.
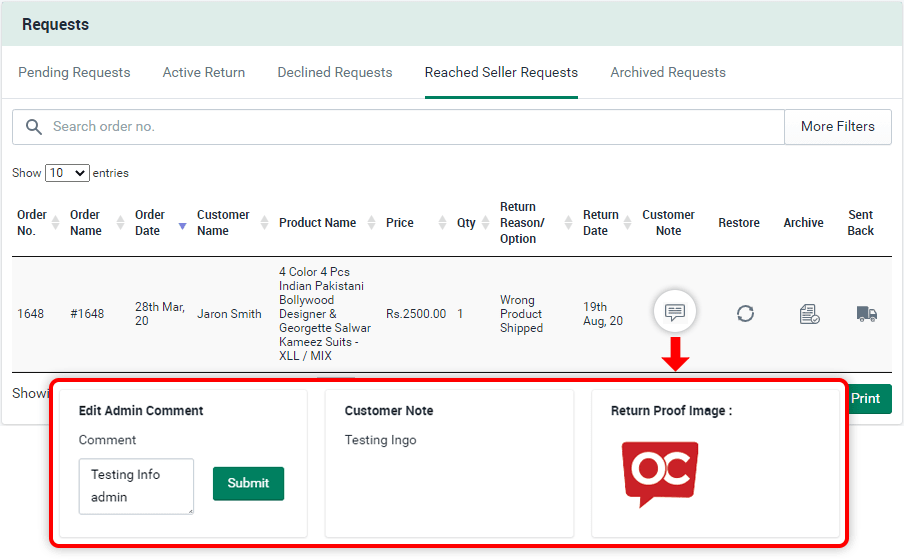
Reached seller requests
Get the declined order list here.You can order your product to reach the seller and send it back. Also edit customer notes.
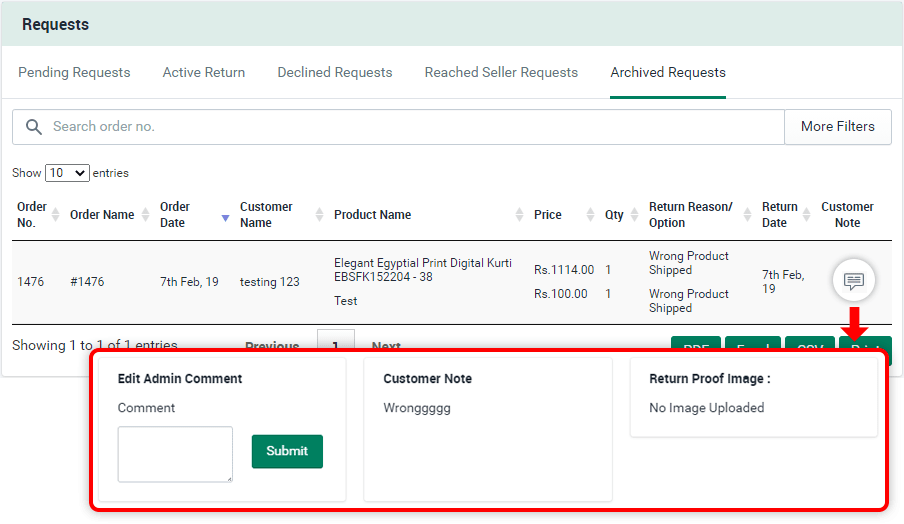
Reached seller requests
See the archived order list here.You can edit customer notes.
Email settings
Send emails to customers / receive notification via mail using email module setup.Email settigs
Set the setting for sending emails such as return request (admin and customer), request approval and deny, request reached seller, sent back by the seller. Add the admin from email ID which you want to use to send mail.
How to open in admin side.
-
Step 1 : Open app from shopify admin.
-
Step 2 : Search Email Setting from the sidebar of app admin.
-
You can use referance variable to built email body which will replaced with original values while sending the email.

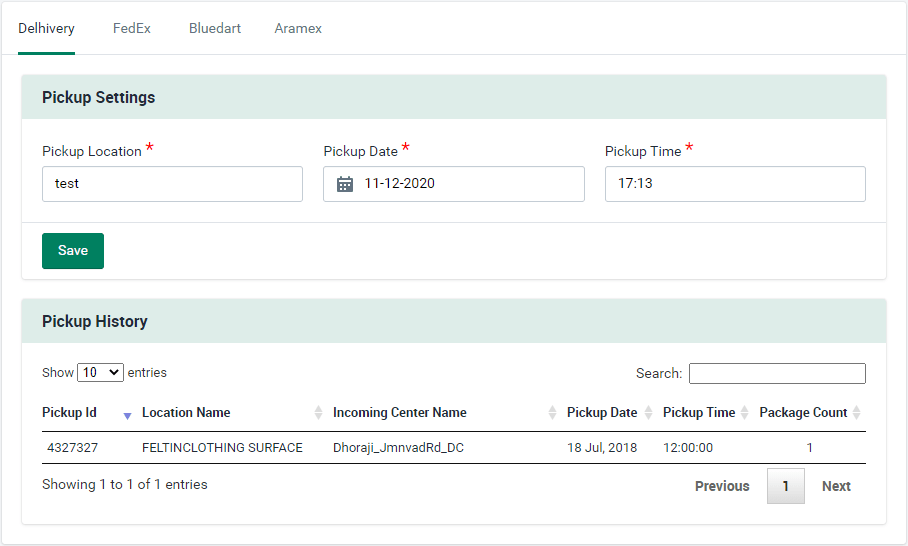
Pickup settings
Pickup settings introduction
Logistics wise default pickup settings.Pickup Settings page setup.
-
Step 1 : Open the app from the shopify admin.
-
Step 2 : Open pickup settings from the sidebar of the app admin.
- Step 3 : Fillup the details for your logistics which will set default while sending the pickup request (you can edit this while sending the request from order page).
Logistics wise pickup history :
Templates
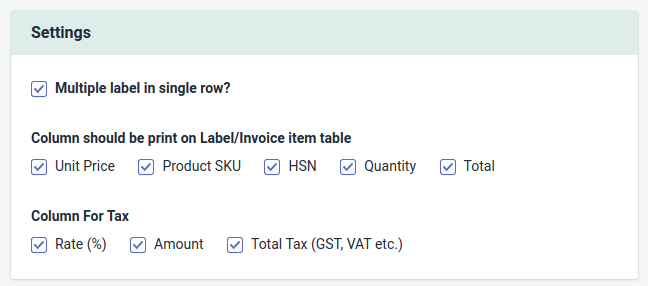
Label and Invoice templates
Settings
-
Step 1 : Open the app from the Shopify admin.
-
Step 2 : Search Templates from the sidebar of the app admin.
You can easily print the shipping labels for a particular order, that contains the shipper & recipient address, tracking number and the service selected.
As per this setting the fields will be displayed in Invoice/Label.
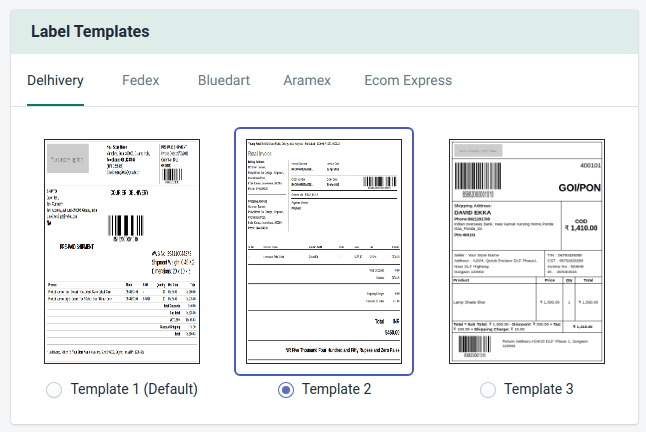
Label templates
You can choose a label design as per logistics.
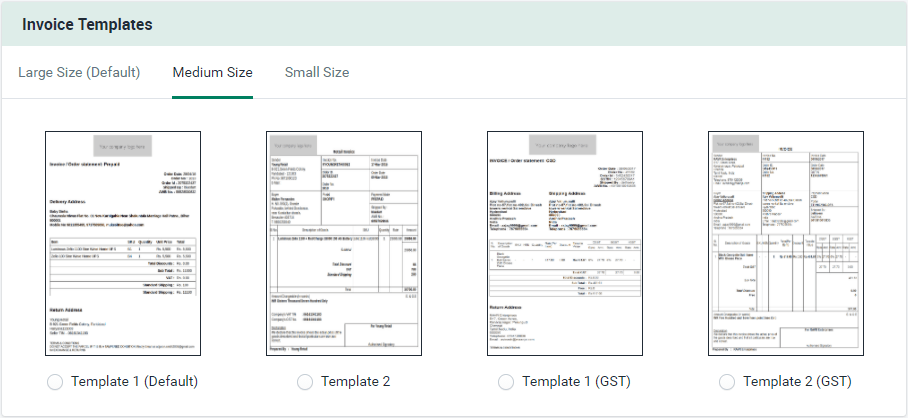
Invoice templates
Choose Invoice templates with GST or without GST with different types of size which is suitable for your store.
Drop us a mail on support@softpulseinfotech.com if you want any customization in this pre-define templates.
Orders
Orders list with all possible filters
Forward shipment process steps and tracking in details.Features
- Order filters based on order number/name/Id, payment mode, customer email, Logistics etc,
- Order details screen with ship, fulfill, edit order action.
- Bulk order shipment process

- Check estimated cost per order

- Print Invoice, Labels and manifest for bulk orders.

- Send pickup request as per selected logistics.

- Order Tracking details using AWB number.

- Fulfill orders in bulk after shipment.

- Clone order from order detail screen.
- Export orders in CSV format.

Customer Order Tracking
How to setup order tracking page on front side for customers?
Follow the steps below to start order tracking on front side :
- First you need to confirm the app proxy, it should be /apps/ils.
- To check the proxy please go to store -> apps -> find app Indian Logistics Services -> click on about.
- Find App Proxy URL and check the end point : ils (If it's store_domain/apps/ils then ignore this steps).
- If it's not ils then click on Customize URL and change end point to ils and save it.
- Make sure you are not using return-request endpoint in your store, other wise you have to change that URL too like : /apps/ils/return-request.


Once proxy setup then set header URL for customers :
- Setup navigation menu link : /apps/ils/tracking
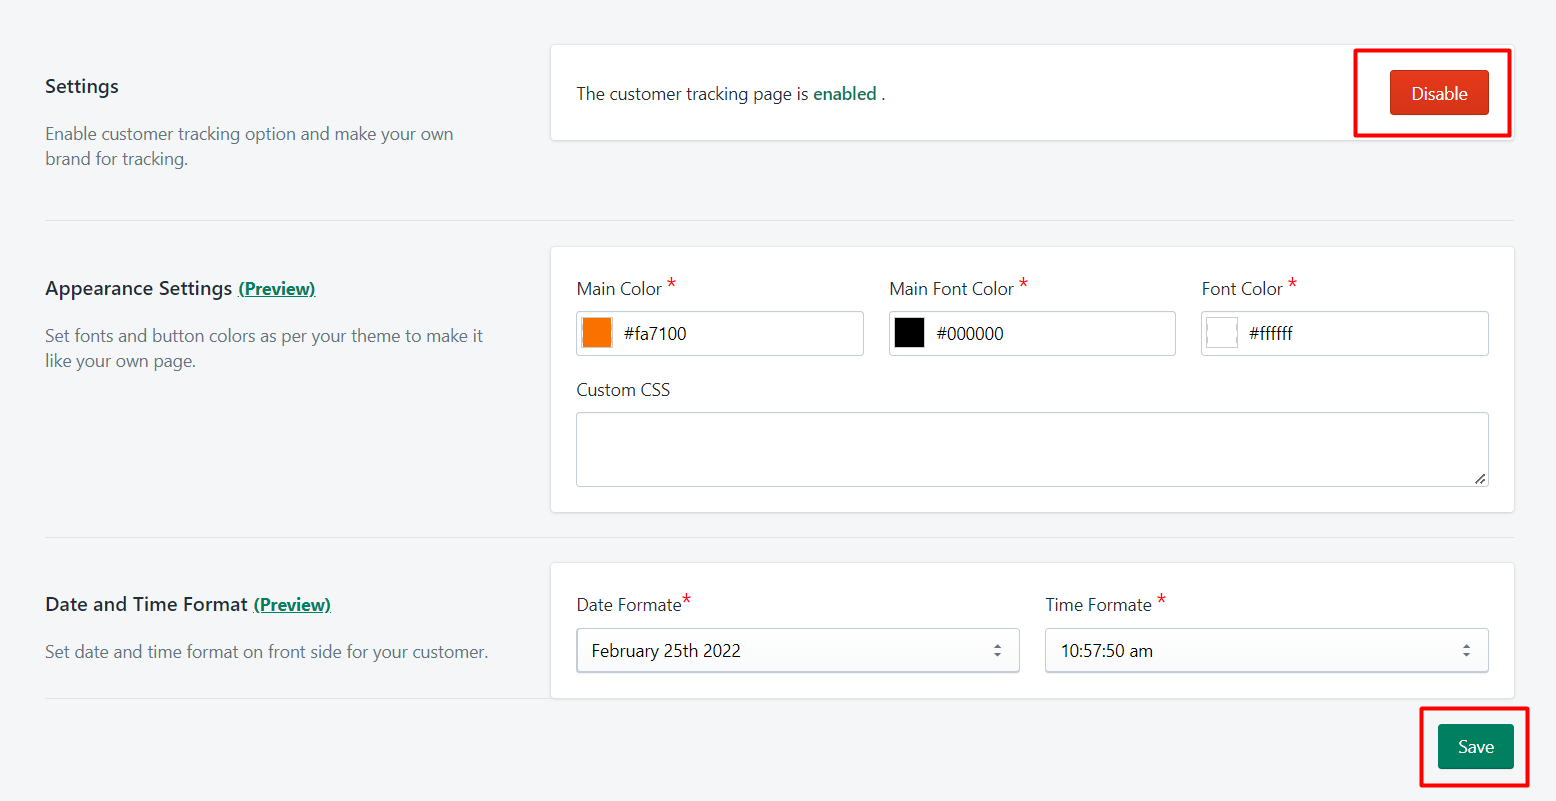
How to enable order tracking?
- Open app and go to settings-> customer tracking from side bar.
- Find Enable/ Disable button on appreance screen and enable it.
- Set theme color and Save the settings.
How Customer can track their order?
There's two way for tracking :
- Customer will get email notification with tracking URL.
- On tracking page add tracking number or order number on your store site.
- From both option customer will be able to check their order current status with order details.

How to add promotion banner on my tracking page?
- Open app and go to settings-> customer tracking from side bar.
- Find Tracking page settings -> Promotion Banner.
- Upload banner as per defined size to make proper view and Save.

Estimated Delivery Date (EDD)
1. How to turn it on (Activation)
Start showing delivery dates on your store.To show the delivery date box, follow these steps:
- Go to Online Store > Themes and click Customize.
- At the top, select the Default Product page.
- Under "Product Information", click Add Block and select ILS - Estimated Delivery.

Add the block directly to the Product Information section.
Pro Tip: Drag the block so it sits right under your "Add to Cart" button. This helps customers decide to buy faster!
2. App Configuration (Admin Panel)
Configure your delivery rules, trust badges, and return policies.A. Basic Setup (General Settings)
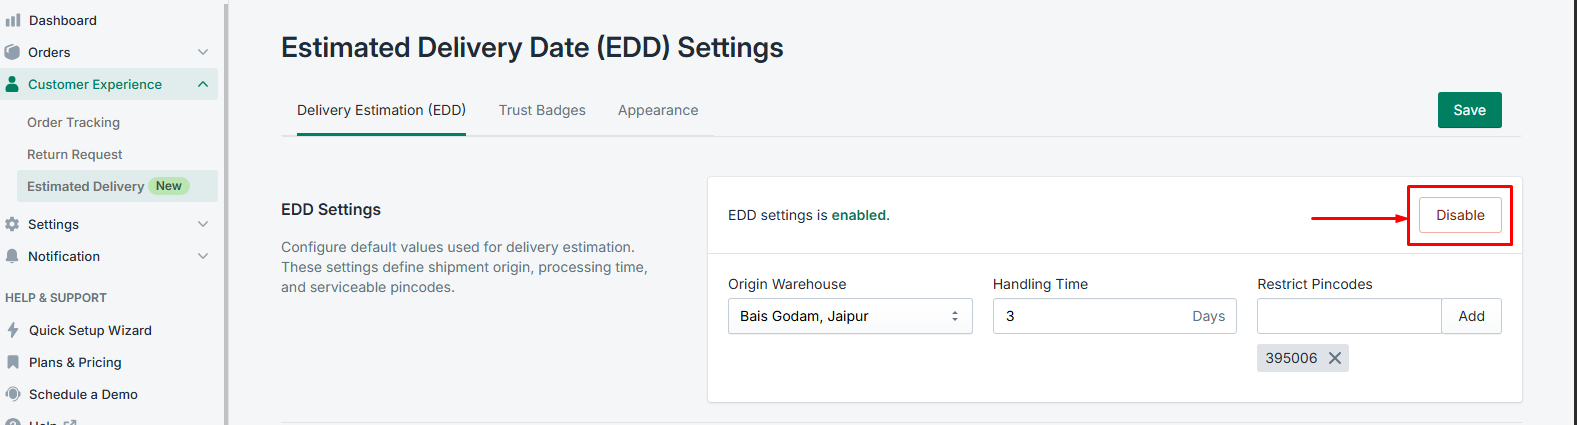
- Enable/Disable Toggle: Use the Enable/Disable button in the app to turn the feature on or off for the whole store.
- Origin Warehouse: Choose the city or pincode you ship from. This is needed to calculate distance.
- Handling Time: This is your "prep time." If you take 1 day to pack the order, set this to 1.
- Restrict Pincodes: If you don't ship to certain places, add those pincodes to the "Restrict Pincodes" list. The app will tell them delivery is unavailable there.
B. Smart Delivery Rules
The app chooses the best delivery date using these rules in order:
- Same-Day: If the customer is in your city and orders before your "Cut-off Time" (e.g. 2 PM), they see "Delivered Today."
- Zones: You can set specific days for Metro cities (fast) vs Rural areas (slow).
- Distance (KM): Set dates based on how far away the customer is (e.g., "Within 500km = 2 days").
C. Days Off (Skip Days)
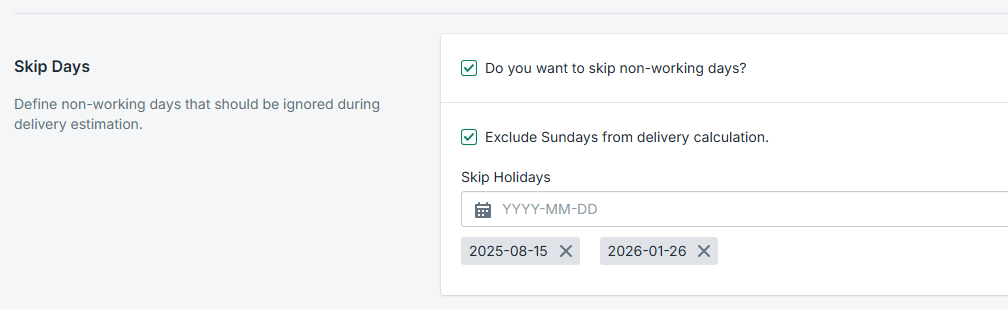
To avoid over-promising, the app skips non-working days:
- Skip Sunday: If checked, delivery dates will automatically move to Monday.
- Public Holidays: Add specific dates like (e.g., Diwali, Independence Day) The app will skip this day when counting.
D. Trust Badges Settings
Boost sales with professional icons.
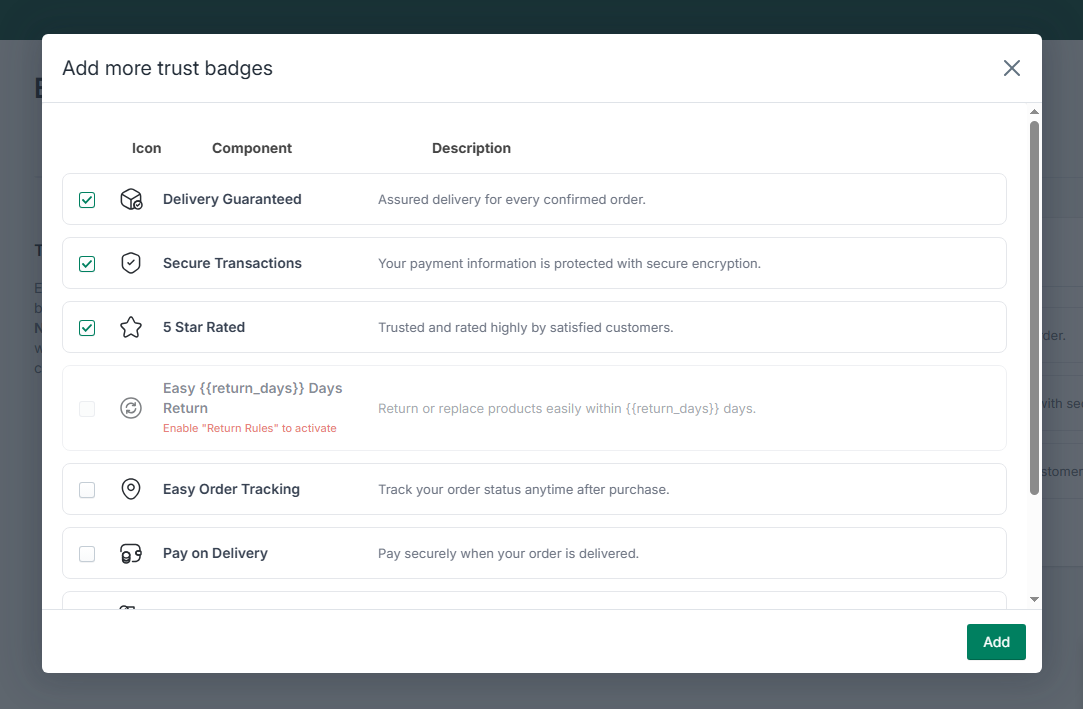
- Add/Remove Badges: Choose from icons like Secured Transactions, 5-Star Rated, etc.
- Return Badge Logic: As shown in the image above, the "Easy Return" badge is locked until you enable Return Rules.
- Dynamic Text: Use
{{return_days}}in badge titles to automatically sync with your return policy.
Badges are icons like "Secure Transactions" or "5 Star Rated." These make your store look more trustworthy.
E. Return Rules & Appearance
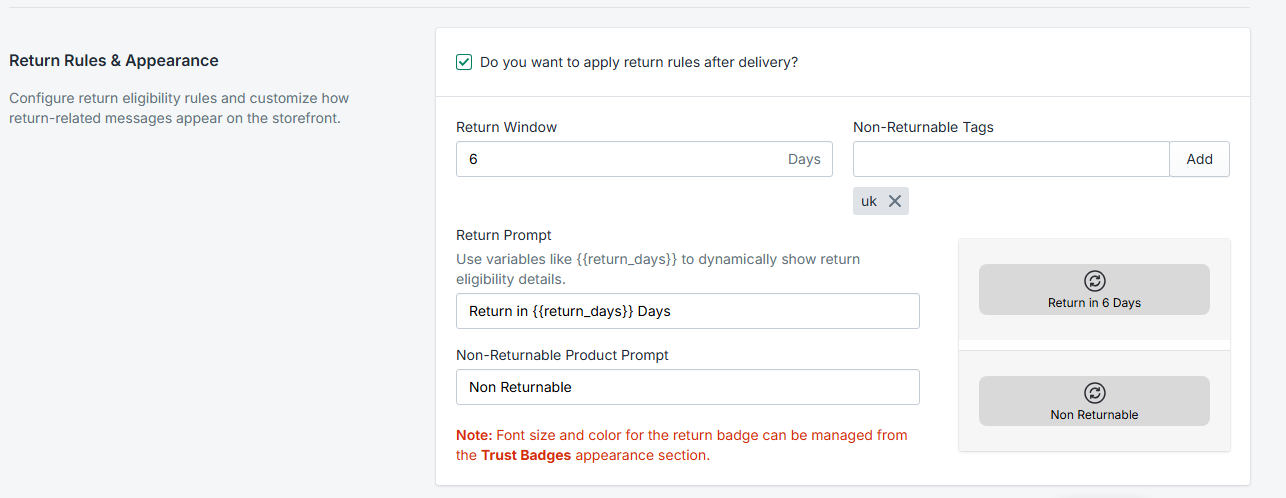
Define your store's return policy and how it appears to customers.
- Return Window: Set the number of days (e.g., 7, 10, 15) allowed for returns after delivery.
- Non-Returnable Tags:
If a product cannot be returned, add a tag like (e.g.,
no-return,final-sale) to that product in Shopify. The app will automatically show "No returns allowed." - Dynamic Prompts: Customize the message shown for returnable vs. non-returnable items separately.
- Timing: The return countdown starts from the day the item is delivered.
F. Appearance & Design
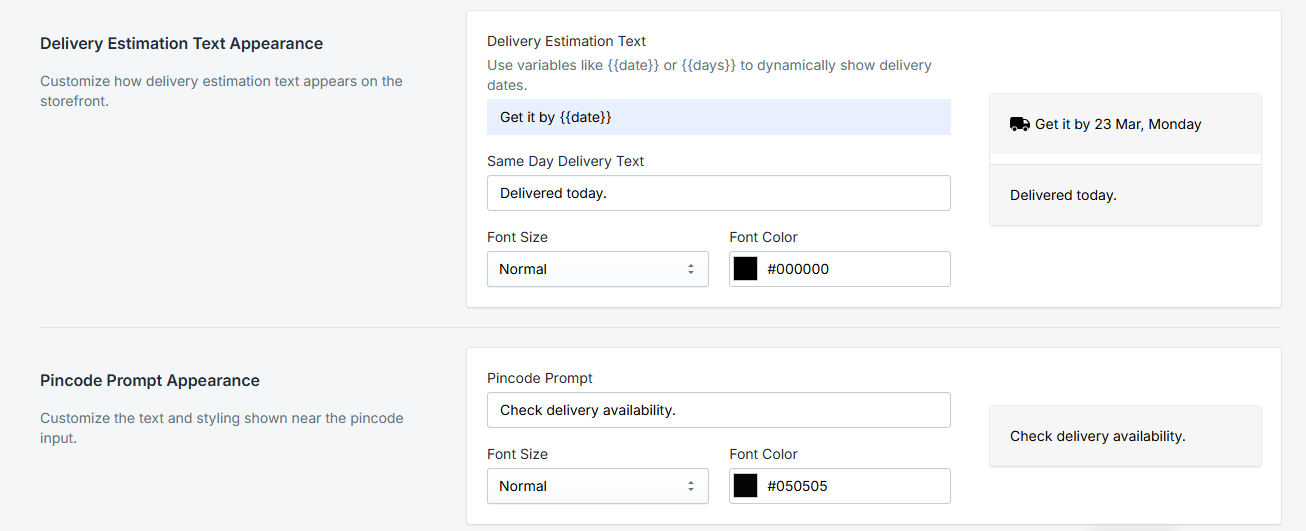
Customize the look in the Appearance tab:
- Colors: Match the text and background to your store colors.
- Text Prompts: Change "Get it by" to anything you like.
- Dynamic Placeholders: Use
{{date}}to show the delivery day and{{days}}to show the count. - Custom Styling:
If you want to add a custom border or special background, you can use the Custom CSS box.
Don't worry—any styles you add here are "locked" to the delivery box. They will not change or break other parts of your website.
Example: "Fast delivery by {{date}}" becomes "Fast delivery by 25 Mar."
3. Storefront View & Logic
How customers interact with the widget on your site.
When a customer enters their pincode, the app calculates the most accurate date based on your rules and operational days (Holidays/Sundays).
FAQs
How to do basic setup?
Follow the steps below to start with our app :
- Open app and go to Logistics Configuration from side bar.
- Enable your logistics which you want to use for order shipments and add required details (ex, if you want to use bluedart then you should have bluedart API credentials )
- Disable test mode in settings if your added details are production details.
- Now go to the orders screen from sidebar, select order and click on bluk ship button.
- At top of the orders scren you will find other buttons like Print Invoice, Print Labels, Bulk Ship, Bulk fulfill, Print manifest etc..
How to setup logistics?
Follow the steps below to set any logistic :
- Open app and go to settings from side bar.
- Find Shipping Method section and enable logistic.
- Enable your logistics which you want to use for order shipments and add required details (ex, if you want to use bluedart then you should have bluedart API credentials )
- Disable test mode in settings if your added details are production details.

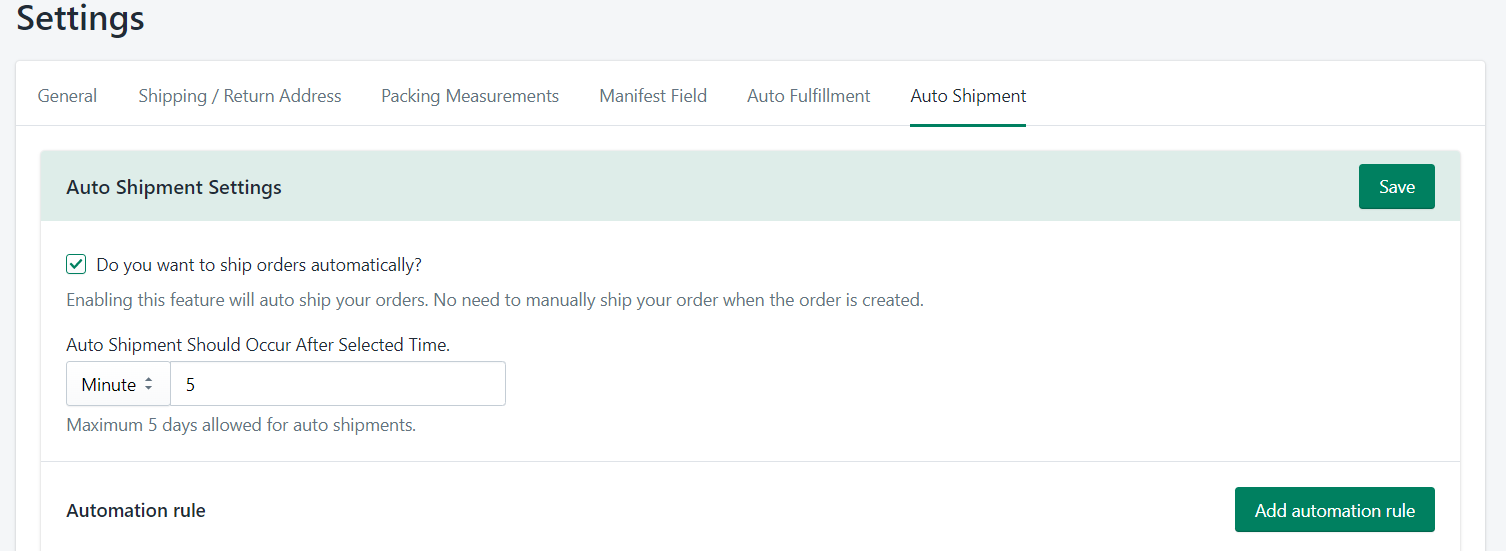
How to enable Auto Shipments?
Follow the steps below :
- Open app and go to settings from side bar => Auto Shipment tab.
- Enable option and add auto ship time after order placed.
- Add Automation rules and logistics and packing details.
- You can create multiple rules and set priority for shipments with multiple logistics.
- As per priority system will check the rules criteria and with satisfied rule details order will get shipped.
How to enable Auto Fulfillment?
Follow the steps below :
- Open app and go to settings from side bar => Auto Fulfillment tab.
- Enable and choose given option as below and "Save" the settings.

Can I connect with my multiple logistics account?
Yes, We have given the settings to add multiple accounts with API details in all logistics and you can choose account while shipments.

How to push tracking information in shopify?
There's no manual steps to push those details, if you ship and fulfill your orders by this app then tracking details will be sent to shopify and email will be sent to your customers with tracking information.
Can my customers can track their order on my store?
Yes, you can setup your own branded order tracking page with your promotional banner and theme setup. your customers can enter their order number to check current status.
How to send order return request?
Follow the steps to setup your own order return page where your customers can select the order, add reason, upload proof image and send request.
- Set navigation or link for customers Return Request.
- you can follow the steps Return request setup steps.
- By this setup your customers can directly send a return request and you can process the same.
Automation
Enable Auto Shipments
Ship your all orders automatically with your own condition
- Open settings from sidebar and move to auto shipments tab.
- Enable auto shipment option and set timing for auto shipment.
- To set logistic account and packing details click on Add Automation Rule button.
- Here you can select logistics account, packing details, order type (COD, Pre-paid) and from location, also there's option to set rule name to identify.
- You can set more rules with AND and OR condition based on order totle, items count and order content.
- The order content rules will be works as below :
- Contain Any : If selected values any one exist in real order then rule should satisfy.
- Does Not Contain Any : If not any of selected values exist in real order then rule should satisfy.
- Contain ALL : If all selected values exist in real order then rule should satisfy.
- Does Not Contain All : If all selected values are not exist in real order the rule should satisfy.
- If you want your orders auto ship when all rules are met, you'll need to set it to AND condition in the settings. If you want your orders auto ship when any of the chosen rules are met, set it OR condition.


Enable Auto Fulfillments
Fulfill all orders automatically
- On create new AWB automatically push the same details in shopify
- All orders will get automatically fulfilled in your shopify store.
- To enable auto fulfillments please open settings -> Auto Fulfillment tab.
- Enable option and select mode of fulfillments
- When delivered to customer : Orders will be fulfilled in shopify when the order will get delivered to customer.
- When AWB created : Orders will be fulfilled in shopify on create shipments (AWB).

Enable Auto Approve Return Request
Automatically approve all return request and create AWB number automatically for return pickup.
- To enable auto return please open Return Request -> Auto Approve Settings tab.
- Enable option and select logistic account for process the pickup
- If this option enabled and customer raise a return request then it'll create AWB number by selected logistics and send pickup request automatically in background.
